Let's get sewing!
Here's how to read your templates and sew them together. If anything doesn't make sense, or you get stuck, just send me an email. I'm always happy to help.
Before you print
- Only print the pattern pieces, not the guides before them. The guides are best kept on screen, and it saves a lot of paper and ink!
- Check the size first. Print just the first piece page at Actual size or Do not scale, and measure the scale bar at the bottom. If it's exactly 1 inch (2.54 cm), print the rest. A4 and Letter both work.
If your printer shows an error or asks to shrink the page, it's usually trying to print the landscape guide pages. Just print from the first piece page onwards. Printing from a phone can change the size, so a computer is safest.
Before you start
- Pre-wash your fabrics: you may want to pop a colour catcher in the first wash. Dark fabrics can bleed into light ones, so wash them separately if you need to.
- Paper: standard printer paper works fine, but if you'd like something a little better, blank newsprint or thin printer paper tears away most easily.
- Grain: try to keep the straight grain along the outer edges of each section, so they don't stretch when you join them.
- Handy to have: a washable school glue stick or water-soluble fabric glue, a postcard, an add-a-quarter ruler, rotary cutter, iron, and a window or light box.
Reading your templates
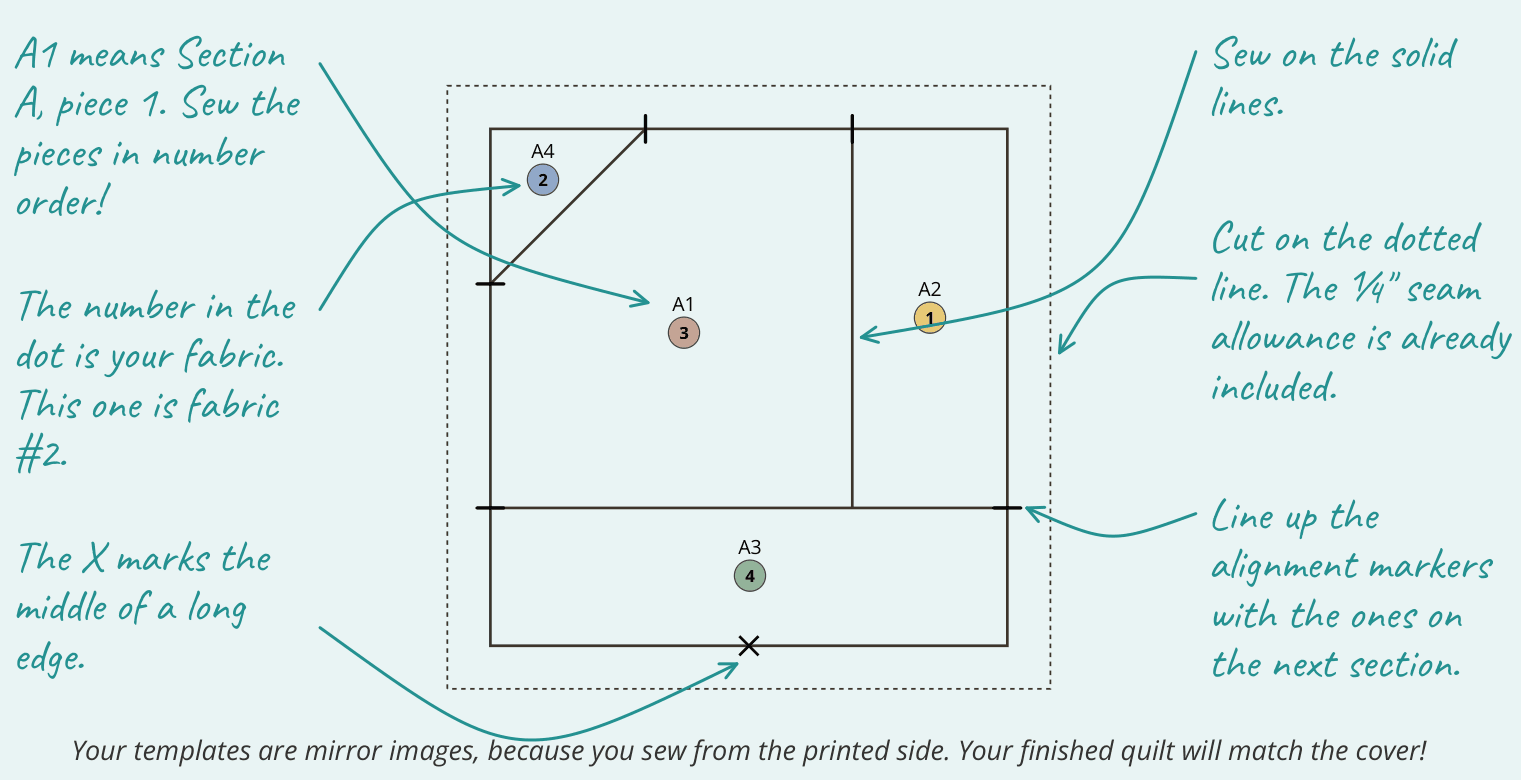
- A1 means Section A, piece 1. Sew the pieces in number order!
- The number in the dot is your fabric.
- Sew on the solid lines.
- Cut on the dotted line. The ¼" seam allowance is already included.
- Line up the alignment markers with the ones on the next section.
- The X marks the middle of a long edge.
I've drawn the fabric see-through, like holding your template up to a window or light box.
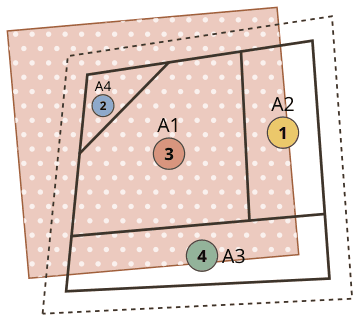
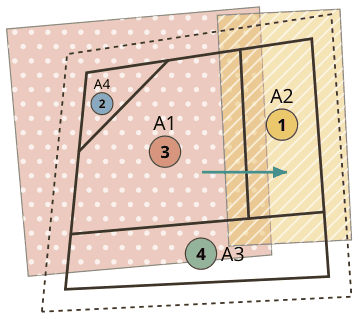
1 Start with piece 1
Cut your fabric pieces about ½" (1.3cm) bigger than their shapes on the template. Scraps are perfect for this! Hold the template printed side down and lay the first fabric (the fabric number shown in A1) right side up on the blank side, so it covers A1 with at least ¼" (0.6cm) to spare all round. Holding it up to a window or a light box helps you check, and a dab of a washable school glue stick or water-soluble fabric glue keeps it in place.
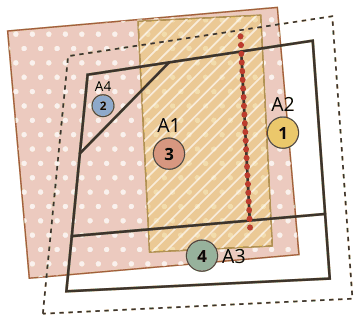
2 Add piece 2 and sew
Lay the second fabric (the fabric number shown in A2) on top, right sides together, with its edge reaching at least ¼" (0.6cm) past the line between A1 and A2. Flip the template over and sew right on the line with a short stitch (1.5mm or less). Go 2–3 stitches past each end of the line, so the seam stays put when the paper comes off.
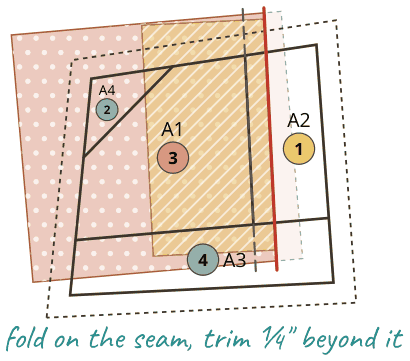
3 Fold and trim
Fold the paper back along the line you just sewed (a postcard can help make a nice crisp fold), then trim the fabric to ¼" (0.6cm) beyond the fold. An add-a-quarter ruler makes this really easy. Leave the outside edges of the section for now.
4 Press it open
Flip the second fabric over so it covers A2, and press it flat with a dry iron, or just your finger. Hold it up to the light again. If A2 isn't fully covered, don't worry! Unpick it and try again with a slightly bigger piece. It happens to all of us.
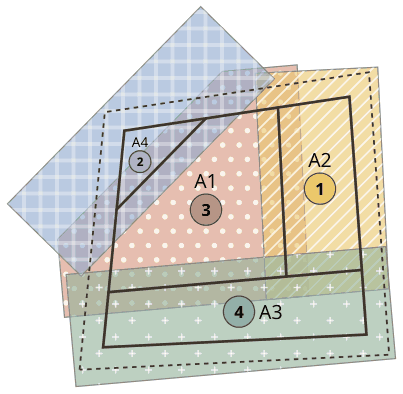
5 Keep going!
Add the rest of the pieces in number order in just the same way, A3 and then A4, until the whole section is covered.
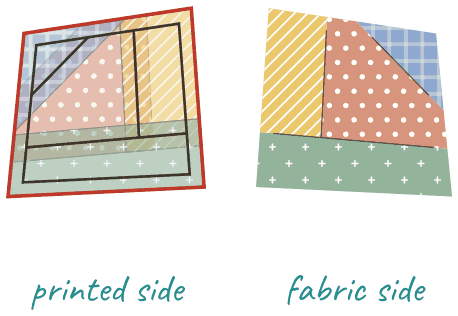
6 Trim your section
Trim all the way round on the dotted line. That leaves your ¼" (0.6cm) seam allowance in place. Turn it over and you'll see it's a mirror image of the template. That's exactly right!
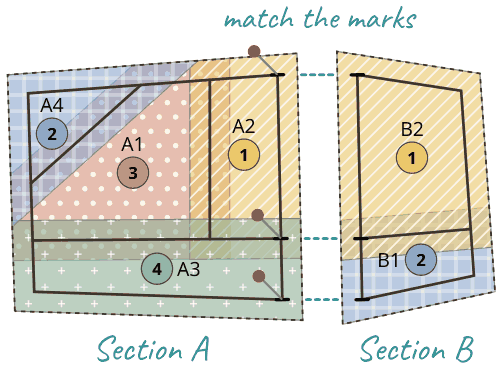
7 Join your sections
Follow the Assembly Instructions to put your sections together. Place two sections right sides together, push a pin through the matching alignment markers on both papers, then sew on the solid outer line. Pressing these seams open keeps things flat where lots of seams meet.
8 Tear away the paper
Once all sections are joined, carefully tear away the paper and give your quilt top a final press. Then stand back and admire your work!
My favourite trick
I push a straight pin through matching alignment markers to line them up perfectly, then clamp them with alligator clips. Once a seam is sewn, I take the paper off that seam before adding the next section. It makes the final paper removal so much easier, and lets me make little adjustments as I go.
Sections with just one piece
Some sections are just one piece, so there's nothing to sew. Glue it right side up on the blank side with a washable glue stick or water-soluble fabric glue, ¼" (0.6cm) to spare all round. Keep the glue off the lines. You can also stitch just outside the solid line for extra hold, then trim on the dotted line.